How to inspect and clean reusable 3M respirator?
8/7/2020 (Permalink)
 3M respirator, mold remediation, mold removal, mold inspection, mask clean up
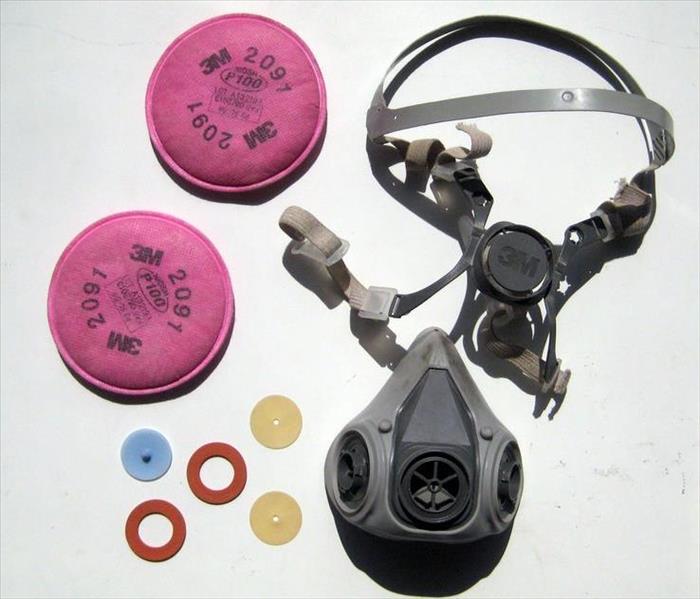
Inspection of 3M™ Reusable Respirators is recommended before each use to ensure good operating condition. The facepiece must be repaired or replaced if there are damaged or defective parts. The following inspection procedure is suggested:
- Check facepiece for cracks, tears and dirt. Be certain the facepiece, especially the faceseal area, is not distorted.
- Examine inhalation valves for signs of distortion, cracking or tearing.
- Make sure that head straps are intact and have good elasticity.
- Examine all plastic parts for signs of cracking or fatiguing. Make sure filter gaskets or seal areas are in good condition.
- Remove the exhalation valve cover and examine the exhalation valve and valve seat for signs of dirt, distortion, cracking or tearing. Replace exhalation valve cover.
- Inspect the lens of full facepiece respirators for any damage that may impair its performance or vision.
Cleaning is recommended after each use. 3M™ Respirator Cleaning Wipes 504 may be used as an interim method in the cleaning schedule for individually assigned respirators, but this should not be the only method in place. During fit testing, these wipes may also be used to clean masks between employees being tested. However, respirators must be thoroughly cleaned at the end of each day, using these procedures:
- Remove cartridges and filters.
- Clean facepiece (excluding filters) by immersing in warm cleaning solution, the water temperature should not exceed 50º C, and scrub with soft brush until clean. Add neutral detergent if necessary. Do not use cleaners containing lanolin or other oils.
- Disinfect the facepiece by soaking in a solution of quaternary ammonia disinfectant or dilute sodium hypochlorite (30 mL household bleach in 7.5 L of water), or another suitable disinfectant.
- Rinse in fresh, warm water and air dry in a clean non-contaminated area.
- Inspect the respirator components prior to reassembly. A respirator with any damaged or deteriorated components must be repaired or discarded.
- Store the clean respirator away from contaminated areas when not in use.
NOTE: The above information is also outlined in the user’s instructions. Additionally, see specific product user instructions packaged with each respirator facepiece for additional information
Hygienists 3M Australia
How to detect hidden mold?
7/23/2020 (Permalink)
 Hidden mold, mold detection, thermal camera, SERVPRO, North Vancouver, Burnaby
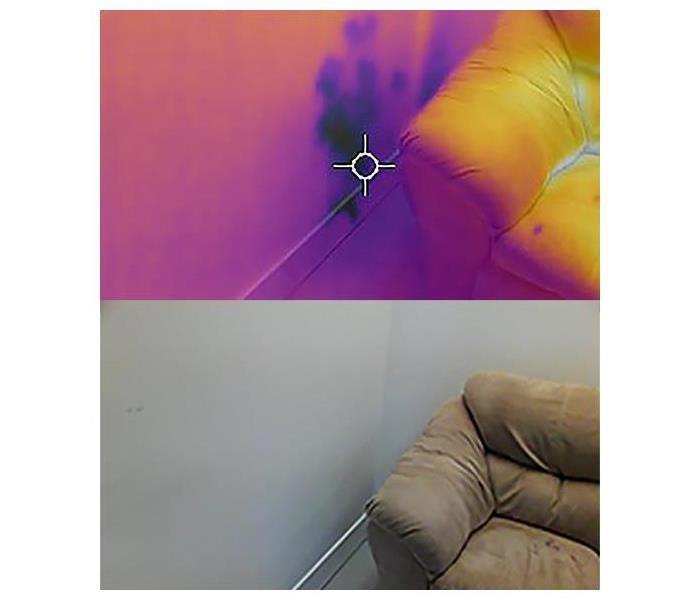
The fact that mold is "hidden" in buildings does not mean one cannot find it. Here we describe use of a borescope to find hidden mold in building wall or ceiling cavities; Growth pattern of some toxic molds in wall cavities maps insulation installation patterns; Strategies for choosing where to make test cuts to check walls or ceilings for hidden mold contamination.
This blog explains methods to find hidden molds in the buildings.
The goal of sampling is to learn about the levels of mold growth and amplification in buildings. There are no EPA or OSHA standards for levels of fungi and mold in indoor environments. There are also no standard collection methods. However, several generally accepted collection methods are available to inspectors to study mold (and bacteria) in indoor environments.
In this method inspector opens the drywall or removes flooring to detect hidden mold. This method is costly and always makes more damage to the building.
Inspector by using high-tech equipment detects mold grow location and provide sample for lab.
SERVPRO of North Vancouver using high-resolution thermal cameras, moisture meter to detect location of the molds after sending the samples to lab, owner will notify on mold type and grow in the building with professional report. This method is cost effective solution and more accurate than other methods.
Reach out SERVPRO of North Vancouver at (604) 558-4849 or Office@SERVPRONorthVancouver.com
Our experts are ready to inspect your property with affordable cost and most reliable results.
Structural Integrity and Mold Growth
6/26/2020 (Permalink)
 Mold Remediation, Hidden Mold, SERVPRO, North Vancouver, Burnaby, Restoration, Water Damage
Molds gradually destroy whatever they grow on, so preventing mold growth also prevents damage to building materials and furnishings.
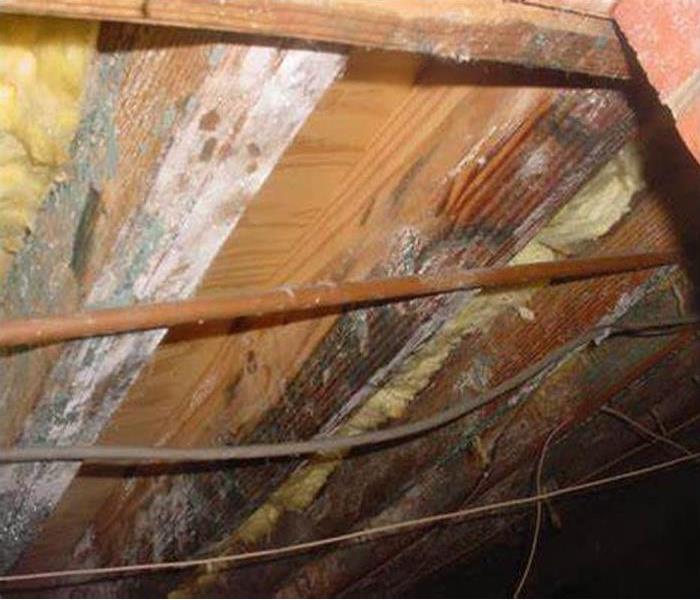
If a mold and moisture problem goes unaddressed long enough, structural damage is likely to result. For example, if a roof is allowed to leak long enough, molds can weaken floors and walls by feeding on the wet wood.
When mold is suspected of causing damage to the structural integrity of a building, a structural engineer or other professional with relevant expertise should be consulted.
Crawl Spaces
Crawl spaces where relative humidity (RH) is high are common sites of hidden mold growth, particularly if the crawl space has a bare earth floor. The soil will wick moisture, through capillary action, from moist to dry areas. The relative warmth of the crawl space will dry the soil by evaporation, adding this moisture to the air in the crawl space where it can cause mold to grow. Also, in areas where the water table is high and weather conditions are suitable, ground water may enter a crawl space.
The moisture that accumulates in a crawl space may also enter another part of the building and contribute to mold growth there. Moisture can pass from a crawl space into a building through cracks in walls, floors and ceilings.
Crawl spaces should be designed specifically to avoid moisture problems.
Drying Buildings, Building Materials, and Furnishings
Buildings and building furnishings will often get wet. They must be dried or "allowed to dry" quickly (within 24-48 hours) in order to avoid mold growth. In general, increasing air circulation and temperature will increase the speed of drying.
Commercial firms that do mold remediation work or work on water- and fire-damaged buildings often use large fans, dehumidifiers and other equipment to dry wet buildings and items quickly before mold has a chance to grow. This action can save money in the long run, because if the building or furnishings are dried completely and quickly, mold will not grow, and a mold remediation will not be needed.
SERVPRO of North Vancouver is Here to Help proving:
- Free Mold Inspections
- Professional Mold Removal


 24/7 Emergency Service